Eyeliner Tutorial
 Chelsey: Hello everyone! I guess today is the day I get to do my first entry, so be kind! I promise it’s gonna keep getting better. : ) So, eyeliner. It’s one of the tricky things that many of us become frustrated with, and decide, ‘today is not the day.’ Here are some tips to get your eyeliner rockin’!
For more makeup tutorials you can visit goodwomenproject.com/makeup!
First: Choose your weapons.


I’ve chosen to show you a two ways to do it.
1. The ever trusty Blacktrack Fluidline from MAC with a #266 brush or 2. The ever lovely Stila Waterproof Eyeliner.
Two very different applications and finishes that will give a similar result. I also showed the #210 brush for you crazy ladies who happen to like the teeny tiny brushes that give you a precise application, but definitely take a little getting used to.
*Tip for Gel Liners of any kind: when using your gel liner, please don’t leave it open. This allows air to get into it and you’ll find it will vacuum itself into the center before you know it and become a big ‘ol chunk of solid product.

Second: Prepping your eyeliner.
I start my eye liner using Fluidline by taking a small sample out of the jar with the back of my brush and applying it to my hand. I actually do this in real life. A brush has never entered this product and for that reason, the product is not only sanitary, but hasn’t dried out in the least. It is open for approximately 10 seconds each time it is used. Take out enough product to assure you can do both eyes. Be sure to put product on both sides of your brush to get that nice sharp line you’re looking for.
To start with Stila……you take off the cap and shake.
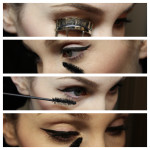
Third: Begin Application
Start on the OUTSIDE of your eye. That’s right ladies, I said the outside. This will allow you more control over where that little flick out the side will go, and assure you  don’t continually build it up until you look like a terrifying Amy Winehouse. (I love me some Amy Winehouse liner!)
Put the line on your eye at the angle you want the liner to be. The great thing about starting it this way, is that is you’re able to take it off if you don’t like it or do it wrong – and you won’t have to wash your whole face.
Once your initial hit of liner is done, pull a second line towards your eye to show how thick you would like to make it. This gives you an easy area to be able to fill.
I then jump to the inner corner of the eye. You don’t have to do this, but it shows that I don’t have some magical skill that gives me a perfect line with the wind flowing through my hair and the liner flowing off of my brush as if it were made to be there.
Small precise placements of the brush will give you a perfect liner with half of the work and a quarter of the frustration.
 The Stila Eyeliner was used on the “Hard Hand” that everyone has. Your less dominant. You’ll see my hand looks like it’s not my own, but it’s that I’ve held the liner as you can see in the picture. Again, this will have a learning curve or you may never like it, but it’s how I do this on myself.
I am also a huge fan of going back and doing little touchups. Take heed in that, know when enough is enough because you can primp and prod all you’d like, there is a point when you have to admit to yourself that enough is enough. And maybe next time it will be easier or more perfect.
I finally added a single coat of the light filter Haute and Naughty Mascara from MAC and a second coat using the heavy application filter. Same mascara, two different applications.
You may also notice I have curled one side of my lashes and not the other. It shows the difference in lashes between curling and not. May not be huge to some, but to me it’s a big deal.


*Mascara tip: If your tricksy mascara decides to hit your eye or face where you don’t want it to, let it dry.
You heard me. Let it dry. It will then flick off with a q-tip without smearing across your face.
I know. So easy. Irritatingly easy.
AND YAY YOU ARE DONE!
 Rhiannon’s Extra Tips: The most helpful tip I can offer is to practice. Even if you’re about to hop in the shower, practice putting some eyeliner on. I’m constantly perfecting my cat-eye liner since there are so many different ways to achieve the look, depending on what you’re going for! Often, my husband will come home from work and find me in sweats with cat-eye liner and falsies on because I’m practicing!
The next key tip: don’t try applying your liner in one long stroke across your entire lid. I find it easier to apply it small, straight lines. If you’re having trouble keeping your eyeliner from smudging, try a brand that is known for its staying-power and make sure you use eyeshadow primer on both your top and bottom eyelids.
Even if you’re very fair and have very light hair, you can pull off black liner! If you’re afraid it’ll look too harsh or dramatic, start off by creating a thin line and keeping the rest of your makeup simple and neutral. Don’t forget to wear black mascara with black liner!
My favorite black liner is the Lacquer Liner 24H L’Oreal Infallible in Blackest Black. This gel-like liner stays on ALL day. It even lasts longer than some of the higher end brands I’ve tried, which is why I use it on clients all the time. It dries to a matte finish, which hides glue from falsies really well! The brush that comes with this liner isn’t half bad, either. If you have difficulty using it try finding an angled liner brush.
My next favorite is Stila’s Stay All Day Waterproof Liquid Eye Liner in Intense Black. This is a felt-tip liner that also has good staying power. Unlike the L’Oreal liner, this dries to more of a glossy finish. A drugstore equivalent to this high-end liner would be Wet ‘n’ Wild’s H2O Proof Liquid Liner in Ultra Black.
Don’t be afraid to experiment and try out different techniques and products and be patient with yourself. I practice my eyeliner all the time and it still is the most time-consuming part of my makeup routine!
False Eyelashes Tutorial
Rhiannon: I remember wanting to wear a set of falsies on my wedding day so badly. The photographer was there, everybody was waiting for me downstairs to take the rest of the “getting ready” photos, and I had a set of falsies stuck to my eyelid about an inch above my own eyelashes. Let’s just say, the falsies didn’t happen that day. Although, now that I’ve had practice and applied countless falsies on clients and friends and family, I find myself wearing them whenever the mood strikes me! Here’s a tutorial for all of you wanting to explore falsies, but not quite sure where to start. Hopefully you won’t end up with a set of falsies stuck to your face right before a big event!
What you’ll need:

A set of false lashes: These lashes are my absolute favorites! They’re not too dramatic, but they’re still full enough to achieve the effect I’m going for. If you’re feeling lost while shopping for falsies, look for styles that are 100% human hair. They’ll look more natural than the ones made with synthetic fibers.
Some type of eyeliner: I would highly recommend wearing some sort of eyeliner with your falsies. Some women do wear falsies without any eyeliner, but I find it very difficult to hide the band the lash hairs are attached to, without any eyeliner on my lash line. Here I have a lacquer liner and an angled liner brush.
Tweezers: I used to apply my falsies with my fingers. That is, until I discovered how much easier it is to apply them with tweezers! Tweezers are able to get right up onto your eyelid the way fingers just can’t.
Eyelash glue: This is my favorite eyelash glue! It comes out of the tube looking white, but dries clear. This glue lasts me all day unless my eyes get teary, or I forget I’m wearing lashes and I rub my eye!
Let’s get started!

Here I am, pre-falsies. This is pretty much my everyday makeup look. Now, let’s say I were going out on a date with my hubby and wanted to take this look from day to night, falsies to the rescue!

1. I’m starting off by applying my lacquer liner. This is going to give you a good base and help hide the clear band that the lashes are attached to. This is how I start off doing a cat-eye look.

I continue slowly building up my liner in small, straight strokes across my lid. You’ll want to get your liner as close to your lashes as possible and even get a bit between your natural hairs. This will help make the falsies look more natural.

2. Measure lashes. Once your eyeliner is to your liking, measure the lashes against your eye. I just lay them on my lid without any glue on them. If they look a little big, you’ll need to cut a bit off. Make sure you cut from the end where the hairs are longer (the end that will sit on the outside corner of your eye). Most people will need to cut at least a tiny bit off. I’ve never done anyone’s makeup who didn’t need me to cut at least a few hairs off.

3. Glue application. Pick up falsies with your tweezers and squeeze a tiny bit of glue out. Run the lash band against the glue so that you apply a thin bead of glue along the length of each lash. Wait for about 30 seconds before applying the falsies. This will allow the glue to become tacky so that it will stick to your skin easier.

4. Place lashes. Now, the fun part! It is usually easier to look down into a small mirror when applying falsies, as opposed to having the mirror level to your face. I think it just gives you a better view of your natural lash line. Make sure you’re holding the lashes in the center part of the lash hairs. Bring them as close to your own lashes as possible without getting them on the hairs.


Once you’ve got the center of the band on your lid, bring the ends of the lash band against the inner and outer corners of your eyelid. Again, you want it to be as close as possible to your own eyelashes, without actually getting any glue on them. You’ll be happy you didn’t get any glue on your lashes when it’s time to take the falsies off!

5. Touch up eyeliner. Once the glue has dried a bit, I like to apply a bit more eyeliner. This will help hide the glue since it dries a little bit shiny. This is also good to be extra certain the entire band is against my eyelid.

6. Mascara. As I’m waiting for the glue to completely dry, I go in with a bit of mascara. I keep the mascara only on my own lashes. This will help adhere my natural lashes to the falsies. If you have naturally curly lashes, you may not find this necessary. Since my lashes are naturally very straight and they angle downward, I find this completely necessary!

These are two of my favorite mascaras! The one on the left (Almay, Get Up) is a bit watery and doesn’t hold a curl as well, but it gives a great natural look. The one on the right (Physicians Formula Organic Wear) gives more of that dramatic, voluminous, look.

Once the glue on your lashes is all dry, you’re good to go! The falsies just open up my eye so much more, right?? My left (your right) eye looks bigger, wider, and more awake than the right eye. Even my eyebrow looks a little bit more arched! Try holding your hand in front of one side of my face to really see the difference.
7. Removal. After you’ve gone out and had a blast with a few girlfriends and it’s time to remove them, here’s the easiest way I’ve found to remove falsies:

Coconut oil! I use this stuff for everything. It’s $5 at Trader Joe’s, or $5-10 at your local health store. It is great as a makeup remover and is perfect for removing eyelash glue. Grab a bit on a cotton swab and melt it in the palm of your hand.

Gently rub the cotton swab with coconut oil onto your lid. Rub it against the lash band, slowly going over and over it until the lash begins to separate from your skin.

The lashes will begin to fall off as the glue breaks down. If they’re a bit stubborn, or if they were attached to a few of your own hairs (ouch!) keep at it. Use a bit more coconut oil and keep rubbing. Trying to rip the falsies off will only leave you eyelash-less!

Success!

If you want to reuse your lashes, go for it! Just pull off the leftover glue and dab a cotton swab in a bit of alcohol and rub it along the lash hairs. This will clean them up for your next night out!
Remember to have fun with it! It took me a lot of time to figure out which lashes I liked better on myself, depending on the look I was going for at that moment. Don’t forget to practice, practice, practice! It used to take me almost 10 minutes to apply falsies to both eyes, but now I can do it in under two minutes! You’ll do great. :) And don’t forget, it’s just makeup!
Chelsey’s Extra Tips: I actually use my hands, not tweezers! So do whatever works for you. When taking your lashes out of the container, don’t pull from one edge and peel it away from the container. This can warp the shape of the lash and make it a little difficult to apply. Place your thumb on the lash at the end and press it against the container. Lightly pull the lash away from the container and be gentle. These little beasts like to hold on so be patient. If you trim from the outside of the lash, the lash appears slightly more natural. Trimming from the inside gives you a slightly more dramatic look.
The 30 seconds Rhiannon recommends to allow glue to dry is ESSENTIAL. To hide the band of the lash, you can apply your liner to the false lash itself. Place the lash on your hand and colour the band with your liner. This will allow for less touchup when you’re glue is dried and a darker lash line.
You can apply mascara to your lashes first. I typically will do my complete makeup before adding my lashes. This will allow you to use the lash over and over again without needing to clean it. For removal, I love Rhiannon’s use of coconut oil. I’m a little more old school. I grab the lash and pull. It will peel off easily and (as long as you haven’t glued it to your actual lashes) it’s a breeze. After that, use your regular makeup remover to remove any excess product from your lid and you’re set.
Brand recommendations: #3 MAC lashes are a great price for a great lash ($17USD/$19CAD). Benefit’s great double stacked lash called Pinup Lash ($18CAD). DUO Adhesive is my favorite lash glue. Give yourself a few tries to really get it and to get it right!